Drivetrain Service*
This service builds on our Deep Cleanse Service, enhancing other drivetrain performance and helping to significantly extend its lifespan. Below are additional options you can choose from to further elevate your bike’s care
- Front Derailleur
- Rear Derailleur (and B-axle if needed)
- Crankset, Chainring and Chainring Bolts
- Pedal Thread and Bearings
- Pulley wheel
Note: The Drivetrain Service is not a standalone option. It complements our Deep Cleanse Service and is tailored for riders who demand peak performance from their bike.
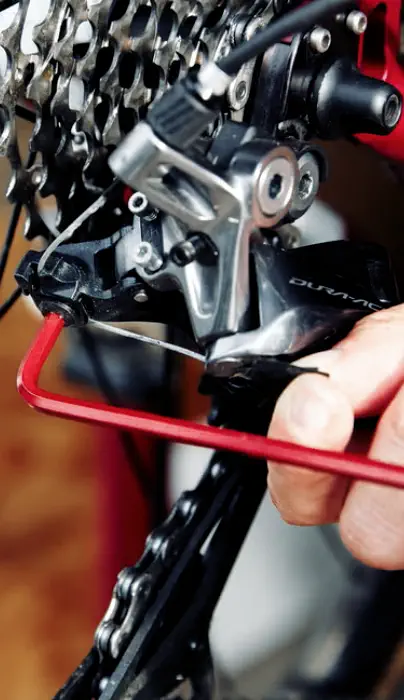
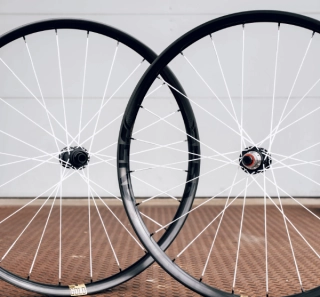
Front and Rear Derailleur
Both Derailleur will be removed from the bike and cleaned separately to ensure they are free from any dirt and all pivots will be lubed afterward before mounting back onto the bike. Additional service on rear derailleurs such as B-axle service and clutch services on some models can be done.
Both derailleurs will be removed from the bike and cleaned separately to ensure all dirt and debris are eliminated. All pivot points will be lubricated before reinstallation. Additional rear derailleur service such as B‑axle and clutch for compatible models are available.
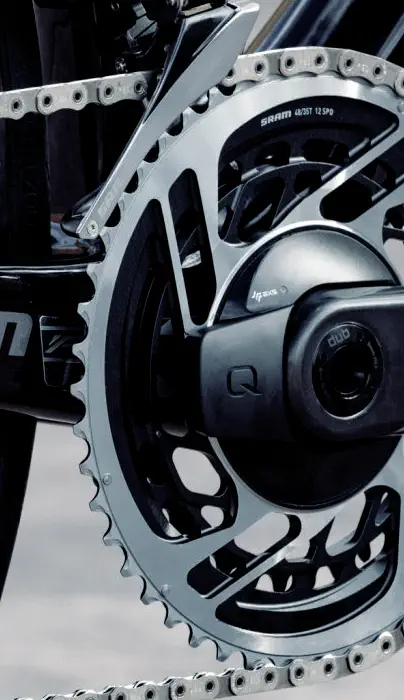
Crankset, Chainring and Chainring Bolts
The crankset, chainring, and bolts will be removed and thoroughly cleaned to eliminate grime, including buildup in hard‑to‑reach areas. The crank will be inspected for any signs of damage or wear (not limited to Shimano recall‑affected models) to ensure its structural integrity.
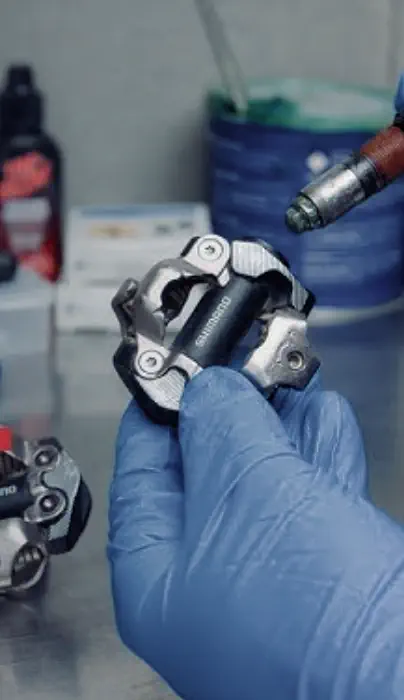
Pedal Thread and Bearings
Pedals will be removed and the threads cleaned thoroughly before applying fresh grease and reinstalling. Bearing servicing is available for a wide range of pedal models, including (but not limited to) Shimano, Look, Time, Speedplay (Wahoo), Favero, and various flat pedals.
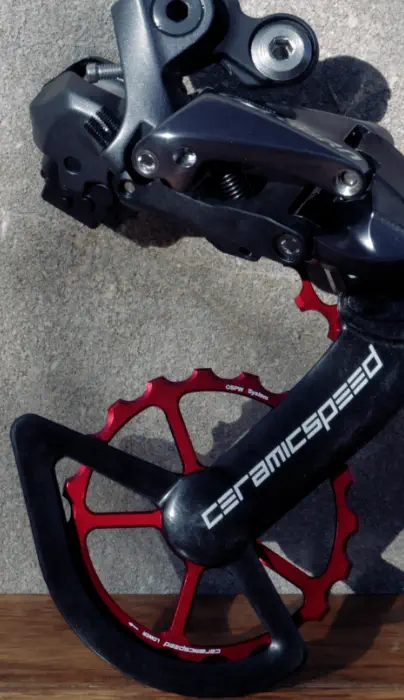
Pulley Wheel
Pulley wheel bearings or bushings will be serviced and inspected for any signs of wear. All bearings maintenance will be carried out according to the product’s service manual to ensure proper care and the correct type and amount of grease are applied.
Insights
Stay updated with the newest trends in AI agents, automation, and workflow intelligence.
Berd Hawk 30 Gold (2026): Exceptional small‑bump damping and “quiet” ride feel

BikeBatik V2 Jersey: A re‑engineered update of the brand’s original icon
Pogi’s Superlight: Lace‑up knit upper with Anatomic Carbon SL sole
FAQ’s
What Riders
Ask Most
Australian coastal riding presents unique challenges for drivetrain components, with salt air being the primary culprit for accelerated corrosion and wear. The difference between coastal and inland riding conditions is substantial—riders moving between environments often notice dramatic differences in component lifespan and maintenance requirements. Understanding these differences helps coastal riders adapt their maintenance strategies to protect their investment.
Salt air corrosion is aggressive and pervasive. Even when you're not riding directly on the coast, salt particles can travel kilometers inland, particularly in coastal cities like Sydney, Melbourne, Brisbane, Perth, and Adelaide. These microscopic salt particles settle on your bike and, when combined with humidity, create a corrosive electrolyte solution that attacks metal components. The process is particularly damaging to drivetrain components—the chain, cassette, chainrings, and all the small moving parts in derailleurs.
The corrosion process begins immediately after exposure. Salt particles attract moisture from the air, creating a thin film of saltwater on metal surfaces. This solution initiates electrochemical corrosion, particularly where dissimilar metals contact each other (like steel chain on aluminum cassette teeth). The corrosion weakens metal surfaces, accelerates wear, and can cause seizing of moving parts. What makes coastal corrosion particularly insidious is that it often starts in hidden areas—inside bearing assemblies, between chain links, and in derailleur pivots—where it's not immediately visible.
Coastal riders typically experience significantly reduced component lifespan compared to inland riders. Chains that might last 3,000-4,000 kilometers in inland conditions often need replacement at 1,500-2,000 kilometers in coastal environments. Cassettes and chainrings show accelerated wear patterns, with salt corrosion pitting surfaces and reducing efficiency. Derailleur pivots and pulley wheels may develop roughness or play within months rather than years.
The humidity common in coastal regions exacerbates corrosion problems. Salt combined with moisture creates the perfect corrosive environment, but even without visible rain, coastal humidity keeps salt deposits active. Inland riders, particularly in drier regions like inland Australia, may have drivetrain components last 2-3 times longer than their coastal counterparts.
Maintenance strategies must adapt to coastal conditions. The most critical habit is post-ride rinsing, even after rides on dry roads. Rinse your bike with fresh water to remove salt deposits, then dry it thoroughly. This simple practice, done consistently, dramatically reduces corrosion. Coastal riders should also increase lubrication frequency—chains that need lubrication every 200-300km inland might need attention every 100-150km coastal.
Product selection matters for coastal riders. Wet lubricants generally perform better in coastal conditions as they provide better corrosion protection and resist washing off. Consider lubricants specifically formulated for coastal or marine environments—these often include corrosion inhibitors. For components that are removed periodically (wheels, seatposts), apply anti-seize compound to threads to prevent seizing from corrosion.
Regular inspection becomes even more critical for coastal riders. Check chain wear monthly rather than quarterly, inspect derailleur pivots for roughness or corrosion, and examine bearing assemblies for signs of corrosion. Early detection of corrosion allows intervention before significant damage occurs.
The financial impact of coastal riding is substantial but manageable with proper maintenance. A coastal rider might spend $300-400 annually on drivetrain maintenance and component replacement, compared to $150-250 for an inland rider with similar mileage. However, much of this increased cost can be mitigated through proper maintenance habits—the additional $100-200 spent on cleaning and lubrication prevents hundreds in premature component replacement.
For coastal riders, establishing a routine maintenance schedule is essential. Rinse after every ride, lubricate more frequently, perform monthly wear inspections, and schedule professional servicing twice annually rather than once. These habits, combined with appropriate product selection, can significantly extend component life and reduce the coastal maintenance penalty.
Chainring bolts are often overlooked during routine maintenance, yet they play a crucial role in drivetrain performance and safety. Worn or loose chainring bolts can indeed cause significant shifting issues, though the connection isn't always immediately obvious. Understanding how chainring bolts affect performance and knowing how to inspect them properly can prevent frustrating problems and potential safety issues.
The primary way worn chainring bolts affect shifting is through chainring stability. Chainring bolts secure the chainring(s) to the crank arms, and this connection must be absolutely solid for precise shifting. When bolts become loose or worn, the chainring can develop slight movement or flex under load. This movement disrupts the precise chain alignment necessary for smooth shifting, particularly when shifting between chainrings or under high pedaling forces. Riders might experience chain drop, delayed shifting, or the chain catching between chainrings.
Wear patterns in chainring bolts typically develop gradually. The bolt threads can stretch or strip with repeated tightening and loosening (particularly if bolts have been removed and reinstalled multiple times), the bolt heads can become rounded from improper tool use, and the interface between bolt head and chainring can wear from repeated torque application and vibration. Each of these wear patterns reduces the bolt's ability to maintain proper tension and secure the chainring firmly.
Checking chainring bolts is straightforward but requires attention to detail. Visually inspect each bolt for signs of wear: rounded heads, visible thread damage, or corrosion. Perform a torque check using a torque wrench—most chainring bolts should be tightened to 8-12Nm (check manufacturer specifications for your specific cranks). More importantly, check for movement: with the chain off the chainrings, try to wiggle each chainring independently of the crank arm. Any detectable movement indicates loose or worn bolts.
Creaking or clicking sounds that correlate with pedaling often indicate chainring bolt issues, particularly if the noise changes when you shift between chainrings. These sounds can be intermittent and difficult to isolate, but they often worsen under load (climbing, sprinting) or when applying force through different parts of the pedal stroke.
The consequences of neglected chainring bolts range from annoying to dangerous. Minor issues include poor shifting performance and annoying noises. More serious problems include complete bolt failure, which can cause the chainring to detach completely—a catastrophic failure that can cause accidents, particularly at speed. We've seen cases where riders continued riding with loose bolts, eventually causing bolt failure that sent the chainring into the frame or caused the chain to jam.
Replacement strategy depends on bolt condition. Bolts with rounded heads or visible thread damage should be replaced immediately—there's no safe way to restore them. Bolts that are merely loose but otherwise in good condition can be cleaned, threadlocked, and properly torqued. However, if bolts have been removed and reinstalled multiple times, replacement is generally recommended. Chainring bolt sets are inexpensive ($15-30) and provide peace of mind.
Torque specifications are critical. Over-tightening can stretch or strip bolts, while under-tightening leads to the very problems we're trying to prevent. Always use a torque wrench and follow manufacturer specifications. When reinstalling bolts, apply a small amount of threadlocker (blue medium strength) to prevent loosening from vibration, but avoid using threadlocker on titanium bolts or in carbon interfaces unless specifically recommended.
For riders who regularly remove chainrings for cleaning or replacement, consider investing in high-quality chainring bolts with features like oversized heads or specialized coatings that resist wear and corrosion. While more expensive initially, they maintain proper torque better and last longer, reducing the risk of issues.
Regular chainring bolt inspection should be part of every comprehensive bike service. The check takes just a few minutes but can prevent significant problems. Many riders overlook this simple maintenance item until it causes a ride-ending problem—don't wait for failure to inspect yours.
Crankset bearings (part of the bottom bracket assembly) are critical components that significantly affect pedalling efficiency and ride quality. Determining when they need replacement versus cleaning is a common question, as early bearing wear can be subtle and develop gradually. Understanding the signs and progression of bearing failure helps riders make informed decisions about maintenance and avoid unexpected failures.
The most telling indicator of bearing issues is how the cranks feel when spinning freely. With the bike in a workstand (or lifted so the rear wheel is off the ground), rotate the cranks backward by hand. Healthy bearings allow smooth, virtually friction-free rotation with no resistance. Any roughness, grinding, notchiness, or detectable resistance suggests bearing wear or contamination. This test becomes more sensitive as bearings wear—issues that were barely noticeable initially become obvious as degradation progresses.
Noise during pedalling is another clear indicator. Healthy bottom brackets are silent or make minimal, consistent sounds. Clicking, creaking, grinding, or rumbling sounds that correlate with pedalling (and not just coasting) typically indicate bearing problems. These sounds often worsen under load—climbing or sprinting makes them more pronounced. While bottom bracket noise can sometimes be caused by other issues (loose crank bolts, frame interface problems), persistent noise that correlates with pedalling usually points to bearings.
Lateral play in the crankset is a definitive sign of bearing wear. With the bike stationary, grab the crank arms and push/pull laterally (side to side). Any detectable movement, however slight, indicates bearing wear or improper preload. While some systems have designed-in lateral compliance, noticeable play is not normal and warrants investigation.
Environmental factors strongly influence bearing life. Coastal riders exposed to salt air often experience accelerated corrosion, with bearings failing within 6-12 months without proper maintenance. Dusty environments cause abrasive contamination that wears bearing surfaces. Riders who frequently wash their bikes with high-pressure water risk forcing contaminants past seals. For these riders, bearing replacement rather than just cleaning is often necessary, as the damage goes beyond surface contamination.
Bearing type also affects the decision. Cartridge bearings (sealed units) are designed to be replaced when worn—cleaning and repacking them is difficult, often impossible, and rarely extends their life significantly. In contrast, some high-end systems use replaceable cartridge bearings that can be swapped relatively easily. Cup-and-cone systems (less common on modern performance bikes) can often be cleaned and repacked multiple times before replacement is needed.
Mileage provides a rough guideline, though conditions matter more than distance. For typical riding conditions, bottom bracket bearings often last 3,000-8,000 kilometres. Harsh conditions can reduce this dramatically—coastal riders might see failures within 1,500-3,000km. Well-maintained bikes in favourable conditions can exceed 10,000km.
Front derailleur maintenance frequency depends heavily on riding conditions, but for Brisbane cyclists dealing with our unique combination of dust, heat, and humidity, professional servicing every 12-18 months is generally recommended for riders putting in regular miles. High-mileage riders or those particularly exposed to harsh conditions might benefit from more frequent attention.
The front derailleur operates in a particularly challenging environment. Unlike the rear derailleur, which benefits from some chain oil splash lubrication, the front derailleur is exposed to road spray, dust, and contaminants while receiving minimal natural lubrication. In Australian dusty conditions, fine particles accumulate in the pivot points and cable housing, creating resistance and affecting shifting performance. The pivot mechanisms rely on precise, low-friction movement—any contamination or wear becomes immediately apparent in shifting quality.
Several factors influence service frequency. Riders who frequently use the small chainring (common in hilly areas or during recovery rides) put more wear on front derailleur mechanisms, as the system works hardest moving between chainrings. Coastal cyclists face additional challenges from salt air, which accelerates corrosion of pivot pins and springs. Mountain bikers and gravel riders encounter more mud and grit, requiring more frequent attention.
Signs that your front derailleur needs servicing include difficulty shifting between chainrings, chain rub in certain gear combinations, slow or incomplete trim adjustments, or the front derailleur not returning to its resting position properly. These symptoms often develop gradually, so many riders adapt to declining performance without realising how much shifting has degraded.
Professional front derailleur service typically includes:
- Complete removal and thorough cleaning of all components
- Inspection of pivot pins and bushings for wear
- Lubrication of all pivot points with appropriate grease
- Cable and housing inspection/replacement if needed
- Precise adjustment of height, rotation, angle, and limit screws
- Verification of proper trim function (for electronic systems)
The difference between a neglected front derailleur and a properly serviced one is remarkable. Shifts become crisp and decisive, chain rub disappears, and the front derailleur responds instantly to trim adjustments. For riders who've adapted to gradually declining performance, the improvement can feel like a component upgrade.
The most obvious indicator that professional service is needed is persistent shifting issues that don't resolve with standard adjustments. If you've properly indexed your gears, adjusted cable tension, set the limit screws correctly, and verified B-gap, yet shifting remains problematic—particularly inconsistent shifting across multiple gears or ghost shifting (unexpected gear changes under load)—the derailleur likely has internal issues requiring attention. These problems often stem from worn pivot bushings, damaged parallelogram springs, or bent cage plates that affect the derailleur's geometry and movement.
Physical damage indicators are clear signs that professional assessment is needed. A bent derailleur hanger is common, particularly for mountain bikers and those who transport bikes frequently, but it's not something most home mechanics can accurately diagnose or repair. Even slight hanger misalignment (as little as 1-2mm) can cause significant shifting problems. We use specialised alignment tools that measure and correct hanger alignment precisely—something very difficult to achieve accurately without proper equipment.
Excessive lateral play in the derailleur cage indicates worn pivot bushings. While slight movement is normal, noticeable wobble (more than 1-2mm) suggests the bushings are worn and need replacement. This wear occurs gradually, so many riders don't notice it developing, but it significantly affects shifting precision. Similarly, if the parallelogram doesn't move smoothly through its range or feels "notchy," the internal pivots likely need cleaning, lubrication, or replacement.
Cage damage is another clear indicator. If the derailleur cage is bent, twisted, or has damaged pulley wheels, it will never shift properly regardless of adjustments. Bent cages can occur from impacts, chain suck, or even just normal wear over time. Professional inspection can determine if straightening is possible or if replacement is necessary—we've seen many cases where attempting to straighten a weakened cage leads to catastrophic failure.
Noise is often an early warning sign. Grinding, clicking, or squeaking from the derailleur area during pedalling or shifting typically indicates dry or worn pivots that need attention. While occasional noise might be resolved with lubrication, persistent or recurring noise suggests deeper issues that professional servicing should address.
For electronic shifting systems (Shimano Di2, SRAM AXS, Campagnolo EPS), any shifting irregularities beyond what firmware updates or basic adjustments can resolve typically require professional diagnostic tools. These systems have specific error codes and diagnostic procedures that require specialised equipment and training.